Aerolab Gascolator Documentation

Here you will find information pertaining to the Aerolab Flush Mounted Filter Gascolator. To find more information and place an order, please visit http://www.flyboyaccessories.com/product-p/72rr02.htm

Installation Instructions

Owner’s Manual

Didn’t buy the drilling template?

Click here for a printable template.


Aerolab Gascolator Production Unit Pictures

At Flyboy Accessories, we are always adding new products, but one of the most exciting new products that we have seen in a long time is Aerolab’s well-designed and beautifully made Flush Mounted Filter Gascolator.

Flyboy Accessories is the exclusive dealer of this product to North America, and you can find more information or place an order at http://www.flyboyaccessories.com/product-p/72rr02.htm.

Since it’s a new product, many of you have been waiting to see the finished unit before passing an opinion. We now have production units in stock and ready to ship, and we wanted to share a few pictures of the unit for your reference.

PIREP Gear Leg Stiffeners for RV’s

Curious about whether our Gear Leg Stiffeners make a difference? Check out this pilot report from VAF user and RV Pilot Eddie Seve, originally posted on Van’s Airforce 10-17-2015


Having recently repaired a flat tyre and then having changed tyre pressures to 40 psi, I found that I had managed to produce the dreaded wheel shimmy, the best solution to fixing this initially was to reduce tyre pressure. I have found that around 34 psi worked well for me, however there where still situations where shimmy would still be evident as I was rolling out on landing and if I got a little fast during taxi.

Also for those of us flying with the little wheel at the correct end, I was also facing the dilemma of having to pull off the perfect 3 pointer so as not to get 3-4 landings for the price of 1.

Having heard about gear leg stiffeners from the VANs instruction manual and also the Vans Air Force Forum, I did wonder how well this device might actually work.

When the opportunity arose to purchase some and have them included in a friends FWF shipment, I thought, why not.

A guy called woodmanrog on the forum makes these specifically for the RVs and at $60 they are not overly expensive in the scheme of things.

Last weekend I installed them on VH-EWS my RV7.

They are designed to install onto the rear side of the gear leg and come pre-routed so that you pretty much just hold them against the gear leg at the correct angle (a little bit of fiddling with tape and installing removing the fairings is required to determine the correct position) and you’re ready to attach them.

My only hitch was that I run my brake lines up the rear of the gear leg which required me to route a channel into the stiffeners to accommodate the brake lines, not a big deal unless you’re at my local airport Wedderburn and have no power and don’t own a router.

It took me 45 minutes wondering hangar to hangar to find a kind soul who had both, and then 15 minutes to route the channel in both stiffeners before I could start my install.

Installation then only required that I shorten the stiffeners so that they did not interfere with the top and bottom of my gear leg fairings.

Once you have everything positioned the instructions ask you to bond the stiffeners to your gear legs with fiberglass, from a maintenance and rust perspective this did not appeal so I chose to strap them into place using 3M Gaffer Tape. Using the 3M tape, the bond that you achieve is incredibly strong, and I am sure that I could do a nicer job of the wrapping if I did it again, but….it is serviceable.

So do they work?

You bet, I went out and shot some touch and goes on what could only be described as a hot bumpy day (2 pm last Sunday) with a 5-7knot cross wind and they worked a treat, there is a vastly reduced tendency to relaunch you back into the air if you drop on slightly in the flair.

I was also able to easily get my left wheel to run down the runway and hold it there while the right was still in the air and counter the cross wind until speed diminished and the right wheel and tail wheel came down, possibily the placebo effect.

Rolling out there is no tendency to shimmy at all, so I am sold.

I would highly recommend this solution to anyone that is experiencing the dreaded bunny hop or the dreaded wheel shimmy or both.

1.5 years later and the gaff tape is still holding up and the stiffeners are doing their job.

Cheers
__________________
Eddie Seve
Sydney Australia
First Flight 16th July 2012
RV-7 Phase 2, 30 Oct 2012
480 hrs Jan 2016


Whatever ads appear below this line are not related to Flyboy Accessories or our products. 


Upgraded Design of our Deluxe Tailwheel

Your airplane is your baby. At Flyboy Accessories, we know the pride and hard work that goes into every part of your airplane, and we always do our best to make sure that the products on our store are of the caliber you would expect for something that you put on your flying machine.

That’s why we are always looking for ways to improve our products and searching for better alternatives to what we have.

One of the products that has been with us almost since the very start of company is our Deluxe Tailwheel Tire. It’s been an incredibly reliable, durable tire and makes a nice upgrade to the cheap, heavy grease slinger that comes standard with the kit.

Most people say “if it isn’t broken, don’t fix it,” but we got to looking at our tire and found some things to improve. The standard tire design has bearings pressed almost all the way to the center of the tire, with spacer bushings to keep users from over-tightening and to take up space to reach the outside of the hub.

This is all fine and well but if stability is the name of the game, moving the bearings outboard is the right move, maximizing stability of the tire. We’ve engineered an improved bushing to accomplish this and to tighten the tolerances on the axle bolt, and this setup is now standard on all Deluxe Tires.

Oshkosh Deal of the Day: Tom’s Oil Filter Cutter

Every day during Airventure, we will be having a Deal of the Day – some of our best products at way-below-retail pricing. Monday’s deal is on Tom’s Oil Filter Cutters:

Toms-Oil-Filter-Cutter

Quickly open any oil filter in a single pass with this handy tool. One of our best-selling items, available today only at under-wholesale costs. Normally we sell this product for $59 (and our customers love it!). All week at Oshkosh, you can pick it up for just $45, but today only, you can get Tom’s Oil Filter Cutter for only $38.

Act fast – this offer will only last as long as supplies do.

First time ever: Doug Bell Forks available for purchase

Just in time for Oshkosh, we’ve got a large batch of Doug Bell’s excellent tailwheel design ready and available for purchase – no waiting, no mailing list, no preorders.
Bell-Fork

In the past, this product has always been sold on a waiting list basis, spelling long waits for your tailwheel. We have finally ramped up production of the Bell Fork enough to catch up with the waiting list and are proud to announce that we have the forks in stock now for Oshkosh

We haven’t been able to keep them on the shelves yet, so if you’re interested, act fast. Find us this week in Building D, Booth 4035 B/C.

Oshkosh_catalog_2015_front___back_rev_pdf__page_1_of_2_

Even if you’re not at Oshkosh, you can order the Bell Fork (or any of our products) at flyboyaccessories.com. We won’t be able to ship while we are at the show, but we will do our best to make sure that we pull your order and keep it available to ship when we get home.

Thanks,

Flyboy Accessories Team

Amazing Proven Products and Sweet New Ones from Flyboy Accessories

IMG_20150216_122126Check out these awesome products from Flyboy Accessories. From left to right:

1) Our original Screaming Eagle retrofit tailwheel fork, now with standard white powder coated finish. A proven design with well over 500 in service on everything from RVs to Cubs to Pitts. Our lightweight (only 16 ounces bare) fork is streamlined and sets the standard for RV retrofit upgrades. Functionally equivalent to the Bell fork, but slightly lighter, this fork gives great obstacle clearance and improved handling.

Shipped ready to install, the Screaming Eagle fork is an easy drop-in installation for most Van’s RVs. Our Screaming Eagle fork is also available as a complete unit. Shown here with our popular and durable Deluxe tire, which requires no maintenance and doesn’t sling grease like the stock Van’s tires can. Or can use DJM’s popular lightweight tire (not shown). http://www.flyboyaccessories.com/Lightweight-Tailwheel-Tire-p/1002.htm

2) We recently began shipping license-built Bell retrofit tailwheel forks which are also an easy drop-in installation for most Van’s RVs. Also available as complete units. The extremely popular Bell fork has been a top choice for RV builders since 2005 and is proven rugged and reliable. Bare weight is 21 ounces. Functionally equivalent to the Screaming Eagle fork, but slightly heavier, this fork gives maximum obstacle clearance and improved handling.

Shipped ready to install with standard white powder coating which is easily scuffed and painted if other colors are desired, the powder coating acting as a tough, protective primer. Shown here with our Deluxe tire with sealed bearings and optional use zinc plated hubcaps (included with tire). Or can use DJM’s popular lightweight tire (not shown). http://www.flyboyaccessories.com/Lightweight-Tailwheel-Tire-p/1002.htm

3) Another option for the Screaming Eagle fork or the Bell fork is a Matco 6″ pneumatic tire, available directly from Matco (p/n WHLTW35) at this time. The pneumatic tire is an option for those who demand an ultra quiet ride, but may require more maintenance, i.e. checking the air pressure regularly.

4) Our new Condor fork combines the best of pneumatic tire ride with our proven retrofit performance. Bare weight 24 ounces. Also an easy drop-in retrofit for Van’s RVs, this new fork has been in testing for several months and shows the promise of great ride, reasonable cost, and relatively low maintenance. Uses a 7″ Matco hub (p/n WHLTW37) and Kenda tire and tube.  Also available as complete units. Contact Vince for more details. Beta-testing units are available now

5) Not shown, our new Screaming Eaglet Lightweight tailwheel system is available as an upgrade for Sonex type aircraft and other light planes. This tailwheel system weighs in at a svelte 22 oz. including mounting socket, control arm, fork, and all hardware. Uses DJM’s 4″ lightweight tire exclusively. http://www.flyboyaccessories.com/4-inch-Lightweight-Tailwheel-Tire-p/1003.htm  At this time, these units are available by special order.

With incredible products like these, you have no excuse to not upgrade your RV today.

Onex Heel Brake Setup

Our friend and Screaming Eaglet test pilot Todd Reifers sent us this drawing after modifying his Onex brake system to a differential setup (note that the two-seater Sonex will have a different setup, given the different cockpit configuration).

Heel Brake Setup for Onex


Pictured below is the finished installation.

View looking aft from the firewall

View looking aft from the firewall

View looking forward from the cockpit

View looking forward from the cockpit

All images courtesy of Todd Reifers. 


Whatever ads appear below this line are not related to Flyboy Accessories or our products. 


Upgrading to a Full Swivel Tailwheel: A Sonex Owner’s Guide.

Please note: officially, we have discontinued the fork assembly that we were making specifically for the Sonex, but this modification can still be made using one of our other tailwheel fork systems. We recommend the following slate of items from our site for this upgrade:


Here at Flyboy Accessories, we have been making and selling an upgraded tailwheel fork designed for Van’s RV aircraft for years. It recently came to our attention that there was a great need for a tailwheel with similar advantages for smaller planes like the Sonex.

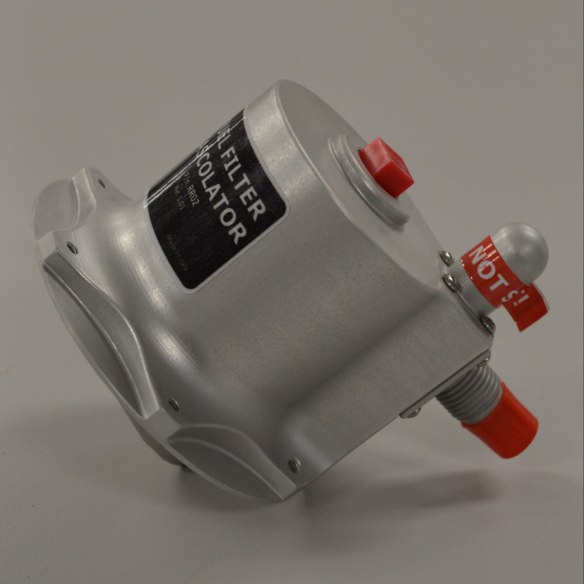
We created the Screaming Eaglet tailwheel, a compact version of our original Screaming Eagle Tailwheel that is built on the same reliable locking mechanism found in most RV tailwheels.

Why should I upgrade?

If you’re flying a Sonex now or have a Sonex kit, you’re probably familiar with the tailwheel assembly. Whether it’s the new machined tailwheel assembly or the original welded caster setup that shipped with earlier models, the Sonex tailwheel assembly, like many small aircraft setups, does not full swivel. This allows the manufacturer to cut costs, but comes at the price of several on-the-ground performance drawbacks.

If you’ve flown on one of these tailwheels or handled an aircraft on the ground, you already know what these drawbacks are: excessively wide turning radius on taxi, difficult ground handling when pushing into your hangar, not to mention the crushing sense of inferiority you experience when you watch one of your RV-flying buddies whip their machine into a zero-radius turn for preflight.

Benefits of the Screaming Eaglet Fork

The ability of the fork to unlock and swivel allows you to make zero-radius turns from the pilot seat, and makes the aircraft a breeze to handle on the ground in and out of the cockpit. What’s more, the Eaglet increases obstacle clearance of the tailwheel vs. the older style welded caster setup and matches that of the newer style machined tailwheel.

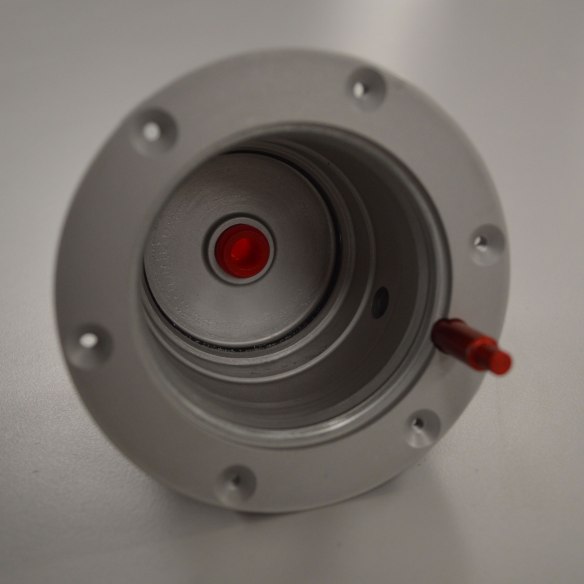
The mechanism of the Eaglet is based on the same locking pin mechanism flying on thousands of RV’s and other aircraft. It’s simple, reliable, and effective.

What happens when I install the Eaglet?

Installing the Eaglet will allow you the full benefits of a high-performance full-swivel tailwheel, but before you go flying, there are a few other issues that you will want to address.

First of all, unless you’ve already made the relevant modifications, your Sonex does not have differential braking. We HIGHLY recommend that you install a good set of differential brakes before flying with the full swivel tailwheel.

The way that the swivel mechanism is designed, the locking pin will disengage and unlock past a certain angle of deflection, so it’s possible to make tight turns, including having the tailwheel unlock completely when pushing the aircraft backwards into the hangar. During normal ground operations, the tailwheel should remain locked in the steerable position.

If you’re replacing the older style welded caster fork, you may notice that the Eaglet will slightly raise the tail. This could potentially change your angle of attack on takeoff, which we will address later in this post.

Installing the replacement fork

The Screaming Eaglet unit is designed to fit the existing tail spring on your Sonex. You will need to measure the diameter of the aft end of the tail spring and order your mounting socket accordingly. Most airplanes this diameter is .625″ or .635″. This diameter should be held constant for the aft two inches of the tail spring.

You can find more information on installing the tailwheel (as well as a wealth of information on the tailwheel mechanism) in our Tailwheel Maintenance Documents, specifically our document Changing a Mounting Socket.

Ancillary modifications

Making the necessary modifications will be quite a bit easier if your Sonex project is still in construction, but it’s not out of reach to make the modifications to a flying airplane (although you’ll want to land it before making any exterior modifications).

The modifications that we recommend to a Sonex owner looking to upgrade to a full-swivel tailwheel are these:

Step 1: Toss that junky old tailwheel setup and replace it with a Screaming Eaglet Complete Unit.

Step 2: Install a good set of differential brakes. Click here to see plans for a heel brakes setup from our Onex test pilot Todd Reifers.

Step 3 (Optional): If you have an issue with angle of attack after your tailwheel is raised, you can correct this by installing larger diameter mains.


Whatever ads appear below this line are not related to Flyboy Accessories or our products.